Quick Start: Install + Connect with WSL (Unsupported)
Configure a Linux environment on your Windows 11 machine to install the Voyant API and connect to your Carbon 30.
⚠️ Important: These instructions are for Windows 11 only. The required
mirrorednetworking mode is not supported on Windows 10.
This guide walks you through setting up a WSL (Windows Subsystem for Linux) environment, installing the voyant-api, configuring static IP settings in Windows, and letting the sensor’s UDP traffic reach your WSL instance.
🐧 Install WSL2 on Windows 11
- Open PowerShell as Administrator.
-
Run the following command to install WSL (WSL2 by default) and the default distribution (Ubuntu):
wsl --installSee How to install Linux on Windows with WSL for more information.
🔗 Enable Mirrored Networking
⚠️ This is the step that is Windows 11 only: mirrored mode needs a recent Windows 11 build and WSL 2 (
wsl --versionreports 2.0 or newer). It does not exist on Windows 10 or on older WSL builds. See Mirrored mode networking for more information.
Mirrored mode gives WSL the same network interfaces and IP addresses as Windows, so the sensor’s UDP stream reaches WSL directly — no port forwarding is involved.
-
Press
Windows + Rand enter:notepad %USERPROFILE%\.wslconfig -
If the file doesn’t exist, choose to create it.
-
Add the following content:
[wsl2] networkingMode=mirrored -
Save the file (Ctrl + S).
-
If WSL is already running, apply the change by shutting it down from PowerShell:
wsl --shutdown
🚀 Start WSL
Launch the Ubuntu (or other) app from the Start Menu.
📦 Install the Latest voyant-api Release
-
Download the latest
voyant-api-debian-*.tar.gzfrom voyant-sdk/releases/latest⚠️ Make sure you don’t have any previous release tarballs or
.debfiles in your Downloads folder before proceeding. -
Copy the tarball from your Windows Downloads folder into your WSL home directory:
cp /mnt/c/Users/<YOUR_USERNAME>/Downloads/voyant-api-debian-*.tar.gz .Replace
<YOUR_USERNAME>with your actual Windows user folder name. -
Extract and install the packages:
tar -xzf voyant-api-debian-*.tar.gz --one-top-level cd voyant-api-debian-*/ sudo apt update && sudo apt install ./voyant-api*$(dpkg --print-architecture).deb -
Verify your installation by running:
voyant_hello_worldYou should see something like:
Welcome to the Voyant Photonics, Inc. API!
You have successfully installed the voyant-api package with:
 - API version:                1.0.0 (API)
 - Interface contract version: 1.5.6
🌐 Set Up Ethernet Adapter (Static IP)
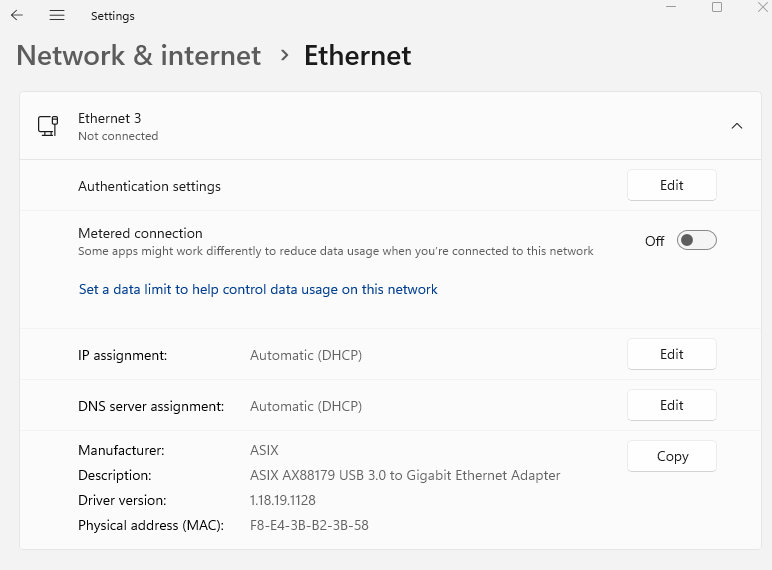
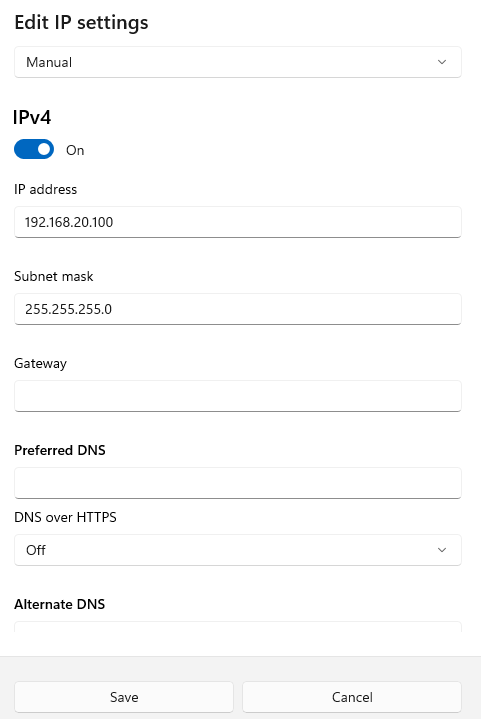
On your Windows machine, configure your Ethernet interface with a static IP on the sensor’s subnet — with mirrored networking, WSL uses this same address. Select Edit on the IP assignment in your ethernet interface’s settings.
Example Settings:
- IP address:
192.168.20.100(on the same subnet as the sensor) - Subnet mask:
255.255.255.0 -
Gateway: (Leave blank)
-
Ethernet adapter not connected / interface details
-
Static IP configuration dialog (Manual)
-
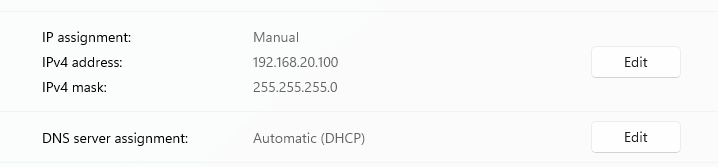
Confirmation of manual IP set
You can now ping your device in both a PowerShell and a WSL terminal with:
ping 192.168.20.20
🔓 Allow UDP Through Windows Firewall
Open PowerShell as Administrator and run this command to allow UDP port 5678 through the firewall — it fails with “The requested operation requires elevation” in a normal terminal:
netsh advfirewall firewall add rule name="WSL UDP 5678" dir=in action=allow protocol=UDP localport=5678
🛠️ Troubleshooting
If you see the following error:
Error: No such device (os error 19)
then you are failing to open the UDP socket. This means mirrored networking is not configured properly, so the network interface is not available inside WSL. (A firewall rule cannot cause this error — it blocks traffic after the socket opens.)
First try restarting the WSL instance by shutting it down:
wsl --shutdown
and relaunch your WSL instance.
If this doesn’t work, evaluate your networking configuration and reach out to us at Troubleshooting Guide.
✅ Next steps
You are now setup to run the voyant-api through WSL. Please refer to the latter half of the Quickstart Guide to start your sensor, visualize point cloud data, record data, etc.