Windows API Tools
They reflect the Meadowlark (Carbon dev kit) API and may not apply to Carbon systems.
Fully updated documentation will be published when Carbon Alpha ships in April 2026.
Questions? Reach out to us at: support@voyantphotonics.com
We have added support for running the API packaged tools on Windows!
⚠️ Currently this process is only tested and confirmed on Windows 11.
Set Up Ethernet Adapter (Static IP)
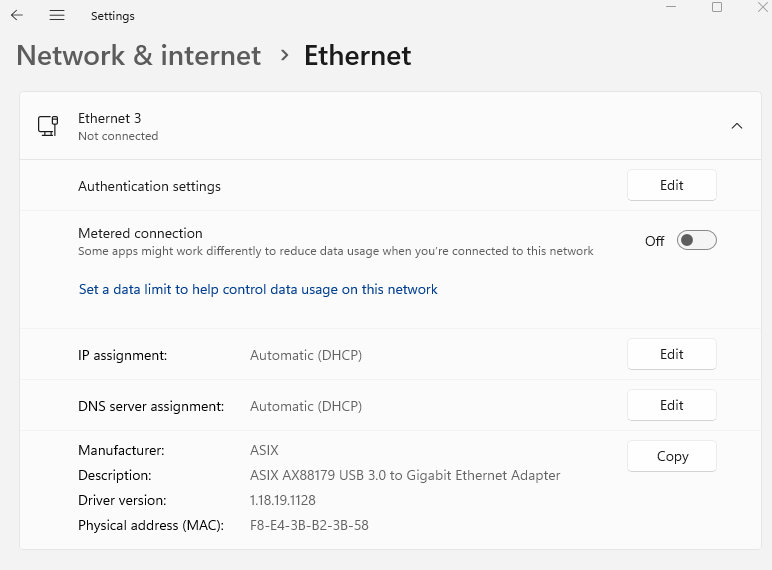
On your Windows machine, configure your Ethernet interface with a static IP that will be used for connecting to the device. Select Edit on the IP assignment in your ethernet interface’s settings.
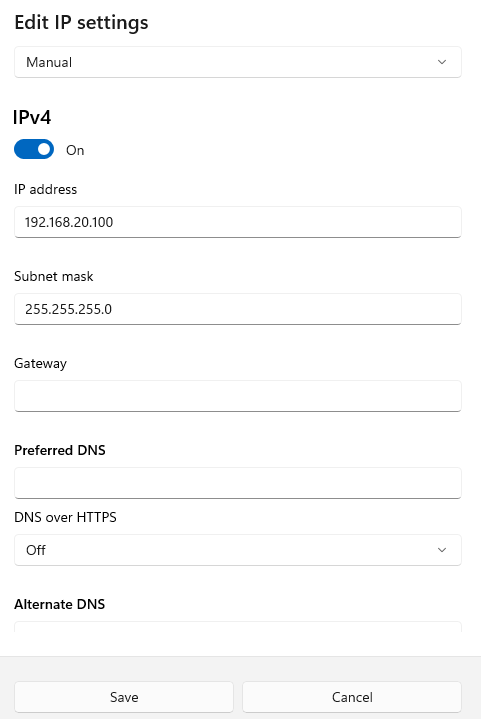
Example Settings:
- IP address:
192.168.20.100(This will be<YOUR_WINDOWS_STATIC_IP>below) - Subnet mask:
255.255.255.0 -
Gateway: (Leave blank)
-
Ethernet adapter not connected / interface details
-
Static IP configuration dialog (Manual)
-
Confirmation of manual IP set

You can now ping your device in a PowerShell with:
ping 192.168.20.20
Refer to our Connections Guide for more information on address selection.
Download the Latest voyant-api Tools
-
Download the windows zip folder (
voyant-api-windows-vX.X.X.zip) from voyant-sdk/releases/latest -
Extract the contents and move the files to your desired location.
-
Open a
PowerShelland navigate to the location you moved the files to.cd Path/to/voyant-api-windows-vX.X.X/ -
Verify your installation, by running:
./voyant_hello_world.exeAnd you should see something like:
   Welcome to the Voyant Photonics, Inc. API!
   You have successfully installed the voyant-api package with:
   - Proto version: 0.2.1 (Proto)
   - API version:   0.2.1 (API)
Start the sensor
Your Voyant sensor does not start the laser and data stream on boot. Instead, the sensor waits for your command. To start the sensor, simply run:
./voyant_lidar_client.exe --endpoint start
The startup procedure can take ~10 seconds. Upon successful completion, you will see:
✅ LiDAR service started successfully
⚠️ Now that you have started your sensor, be sure to safely stop the sensor before powering the system down when you are done with this tutorial.
More information about starting / stopping your sensor is available at
voyant_lidar_client.
Visualize live sensor data with Foxglove Studio
-
Start the Voyant Foxglove Bridge in your PowerShell by running:
./voyant_foxglove_bridge.exe --bind-addr 0.0.0.0:4444 --group-addr 224.0.0.0 --interface-addr 192.168.20.100If either of these errors are thrown:
> Error: No such device (os error 19)
> Error: The requested address is not valid in its context. (os error 10049)
please double check your static IP assignment matches the argument you provide to
--interface-addr(192.168.20.100in these instructions).If this doesn’t work, evaluate your networking configuration and reach out to us at Troubleshooting Guide.
More information about the
voyant_foxglove_bridgetool is available at Visualizing Live Sensor Data. -
Open Foxglove Studio in your browser at https://studio.foxglove.dev/ or launch the desktop application if installed.
-
Select
Open connection...in the upper left section of the window to bring up the connection dialog -
In the connection dialog, select “Foxglove WebSocket” as the connection type.
-
Enter the WebSocket URL:
ws://localhost:8765and click “Connect”. -
Download the
config/voyant_foxglove_cfg.jsonfile from thevoyant-sdk/repository.If you have cloned the
voyant-sdk/repo, you already have this file. -
In the layout selector (top right corner), choose “Import from file…” and select the
voyant_foxglove_cfg.json. -
Have some fun looking at your point cloud!
For more detailed Foxglove user instructions, please see our Pointcloud Visualization guide.
Safely stop the sensor
⚠️ Always safely stop the sensor before powering the system down.
To protect the internal components of your sensor, you should disable the lidar stream before powering the system down.
./voyant_lidar_client.exe --endpoint stop
The shutdown procedure can take ~10 seconds. Upon successful completion, you will see:
✅ LiDAR service stopped and system disabled
More information about starting / stopping your sensor is available at
voyant_lidar_client.
✅ Next steps
You are now setup to run the voyant-api through WSL. Please refer to the latter half of the Quickstart Guide to start your sensor, visualize point cloud data, record data, etc.